Your backyard has been sitting there. Unloved. Maybe it’s a concrete slab you throw a folding chair on in summer. Maybe it’s a plain wood deck that’s seen better days. Either way, every time you walk past the back door you think I should really do something with that — and then you don’t, because everything you see online either requires a contractor or costs more than your kitchen renovation.
Here’s the truth: the most beautiful outdoor spaces aren’t the most expensive ones. They’re the most intentional ones. And a surprising number of the design moves that make a patio look designed — truly, thoughtfully designed — are completely doable on a weekend with a trip to the hardware store.
These are six patio and deck designs that real DIYers build, photograph like a magazine, and finish without calling anyone for help.
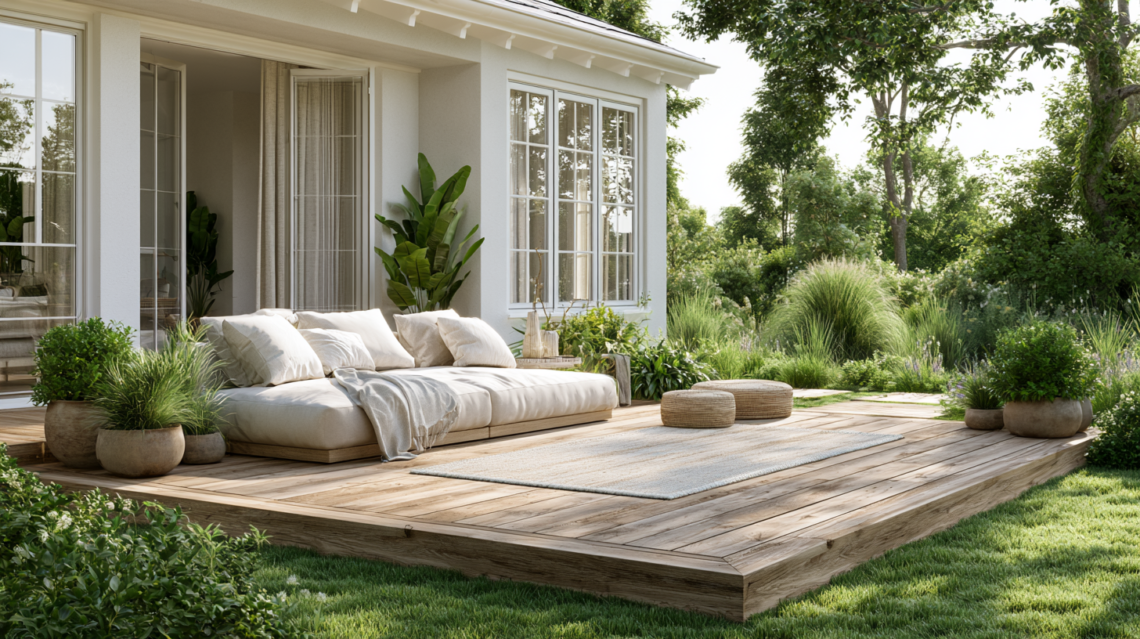
1.The Floating Platform Deck (The One That Looks Hardest and Is Actually the Easiest)
If you’ve ever seen a low, clean wood platform sitting just above a patio or lawn and assumed it was a professional build — it probably wasn’t. The floating deck is one of the most searched DIY projects for a reason: it looks like real construction, and it genuinely is not that complicated.
The basic concept is simple. You build a frame from pressure-treated 4×4 posts and 2×6 joists, lay it directly on concrete blocks or deck blocks (no digging required), and cover it with decking boards. No concrete. No permit in most areas when it’s ground-level and under a certain square footage — check your local code, but most floating decks under 200 square feet don’t require one.
The design move that makes it look expensive: stagger the board direction. Instead of running all decking boards parallel to the house, try a 45-degree diagonal or a picture-frame border. Same boards, same tools, completely different visual result.
Materials for a 10×12 floating deck run $400–700 depending on your decking choice. That’s it. A contractor quotes the same project at $2,500 minimum.
What you’ll need:
- Pressure-treated 4x4s and 2x6s for the frame
- Deck blocks (no digging — they sit on the ground)
- Composite or cedar decking boards
- Decking screws and a drill
- A level. A very patient level.
Easy Backyard Upgrades That Make Your Space Look Expensive (DIY Weekend Projects)
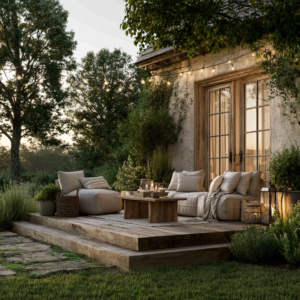
2.The Pergola That Defines the Space (Without Defining Your Entire Weekend)
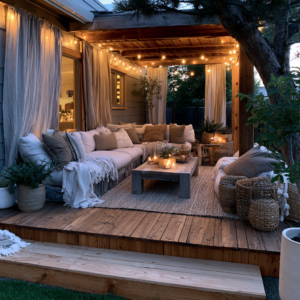
Here’s what a pergola actually does that most people don’t realize: it creates a ceiling. Not a real ceiling — an implied one. And that’s the thing that takes a patio from “outdoor area” to “outdoor room.” The moment you have overhead structure, the space below it feels intentional, cozy, and sheltered even when it’s wide open.
A basic 4-post pergola with a beam-and-rafter structure is one of the more achievable DIY builds on this list. Four posts, two beams, a series of 2×6 rafters across the top. That’s the whole skeleton. You can dress it up with lattice, add fabric panels for shade, grow climbing vines up the posts over time, or hang string lights from rafter to rafter for an effect that looks like it belongs in a boutique hotel courtyard.
The trick with pergola placement: center it over your main gathering area — not your whole patio. A pergola that covers just the dining or seating zone looks more intentional than one that tries to cover everything. Define the space; don’t fill it.
Budget for materials: $300–600 for a 10×10 pergola using pressure-treated lumber. Kits from Lowe’s or Home Depot start around $400 and come with pre-cut pieces if you want to skip the math.
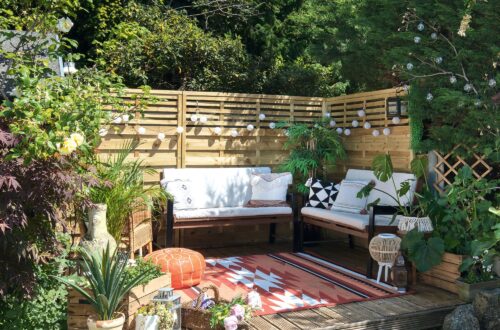
3. Built-In Bench Seating (The Design Move That Does Three Things at Once)
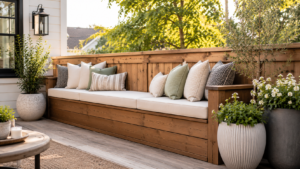
Freestanding outdoor furniture has a place. But nothing makes a deck feel more designed — more finished — than built-in seating. It says someone thought about this space. Someone planned it. That someone can be you, and it takes less skill than you’d expect.
A basic deck bench is essentially a box: two vertical supports anchored to the deck frame or a wall, a horizontal seat board, and a backrest if you want one. The whole thing can be built in an afternoon. And because it’s attached, it never blows over in a storm, never needs to be dragged inside for winter, and never looks like it was just pulled out of a storage shed.
The storage version is the real upgrade. Build the seat as a hinged lid over a hollow frame and suddenly you have a bench that holds outdoor cushions, throw blankets, garden tools, or every inflatable toy your kids own. You’ve solved the outdoor clutter problem and created a beautiful seating area in the same build.
Add outdoor cushions in a neutral linen or Sunbrella fabric and this looks like a $3,000 custom installation. It isn’t. The lumber runs under $100 for a 6-foot bench.
Outdoor Bench Cushions Piano hinge set for storage lid
4. The Privacy Screen That Doubles as a Feature Wall
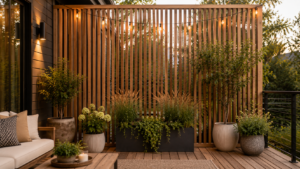
If your patio backs up to a neighbor’s fence, a parking lot, or just a view you’d rather not look at — you don’t have to live with it. A privacy screen is one of the most impactful additions you can make to an outdoor space, and a well-built one doesn’t just block the view. It becomes the view.
The vertical slat design is the one to build. Take 1×4 cedar boards, space them 1–2 inches apart, and attach them vertically to a simple 2×4 frame. The gaps let light and air through while blocking sightlines. It reads as modern, intentional, and expensive — and cedar weathers beautifully to a silver-grey over time if you let it, or you can stain it to hold a warm wood tone.
What makes this more than a privacy fix: hang trailing plants from the top, mount a few outdoor wall sconces or string lights across it, and it becomes the feature wall your outdoor space never had. The focal point that makes everything else feel anchored.
Materials run $80–$150 for a 6×6 panel depending on your lumber choice.
Small Backyard? Steal These Layout Ideas That Maximize Space
5. The Outdoor Rug Trick (It’s Not Just a Rug)
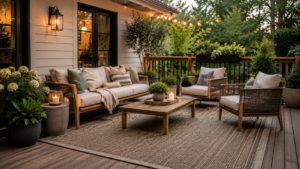
This one isn’t a build — but it belongs on this list because it’s the single fastest way to make a patio look designed, and almost nobody sizes it correctly.
An outdoor rug does what a rug does inside: it defines a zone. It tells the eye where the seating area starts and ends. Without it, furniture just floats on a concrete or wood surface with no visual anchor. With it, you have a room.
The sizing mistake: going too small. Your rug needs to be large enough that at least the front legs of every piece of furniture sit on it. For a typical 4-chair patio set, that’s an 8×10 minimum. A 5×7 rug under a full seating area looks like a mistake.
The good news: outdoor rugs in large sizes are genuinely affordable. A jute-look or flatweave polypropylene rug in an 8×10 runs $60–120 on Amazon and holds up through weather, sun, and everything else. Layer it under your furniture, pull the chairs in close, and watch the whole space transform in about four minutes.
Home Depot Large Indoor/Outdoor Area Rug
Home Depot Large Non-Slip Rug Pad
6. The String Light Canopy (Non-Negotiable)
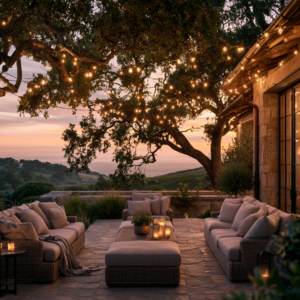
Every great outdoor space has layers of light. String lights are the one you actually control — and when done right, they change the entire feeling of a space from “outside” to “somewhere you want to stay.”
The canopy approach is the most impactful. Run your lights from the house to a pergola, a fence post, or a freestanding pole at the corner of your patio. Cross them back and forth in a loose grid overhead. When you turn them on at dusk, the whole area glows with the kind of warm, diffused light that makes every conversation feel easier and every dinner feel longer.
The hardware that makes it work outdoor string light poles — 8–10 foot powder-coated steel stakes with a hook at the top — anchor in planter pots filled with concrete or quick-set. No drilling into your fence or siding. Set two poles at the far corners of your space and run the lights from house to pole and back. Total cost: under $80 for the poles and lights combined.
This one step — just this — takes a functional patio and makes it a place people don’t want to leave.
Home Depot Outdoor Weatherproof String Light Edison Bulbs
Home Depot Outdoor String Light Poles set of 4
The Honest Truth About DIY Outdoor Spaces
The patios and decks that look designed aren’t the ones with the biggest budgets. They’re the ones where someone made intentional decisions: the right size rug, the overhead light layer, the built-in bench that says this was planned.
None of these builds require construction experience. Most of them require a drill, a saw, a level, and a free weekend. The floating deck is the biggest lift on this list — and it’s still a beginner project if you follow a plan and take your time.
Start with one. Not all six at once. Pick the project that would make the biggest difference in how you actually use your outdoor space — because the best patio design is the one you’re actually sitting on.