Your front yard is the first thing people see. Before anyone steps inside, before they see your living room or your styled coffee table or the gallery wall you spent three weekends on — they see the outside. And if the outside looks neglected, tired, or just blank, it doesn’t matter how beautiful it is in there. These simple front yard updates will help your home look more inviting.
Here’s the truth most curb appeal content won’t say out loud: your front yard doesn’t need a landscape architect or a sprinkler system overhaul to look good. It needs a few deliberate updates in the right places. Small, specific things that signal to anyone walking up: someone who cares about their home lives here.
These are the updates that do the most visual work for the least amount of money — Most can be tackled in an afternoon rather than requiring an entire weekend.
1. Start Here If You Only Have One Afternoon
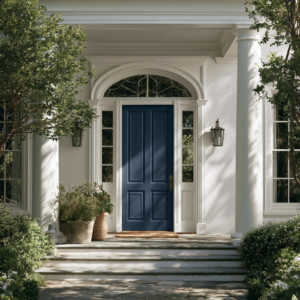
Start with the front door. Clean it, touch up or repaint the surface, replace outdated hardware if needed, and tidy the area immediately around the entry. If you have time left, add two appropriately sized planters or refresh the existing beds with clean edging and mulch. These changes give you the most visible transformation without turning the project into a full landscaping job.
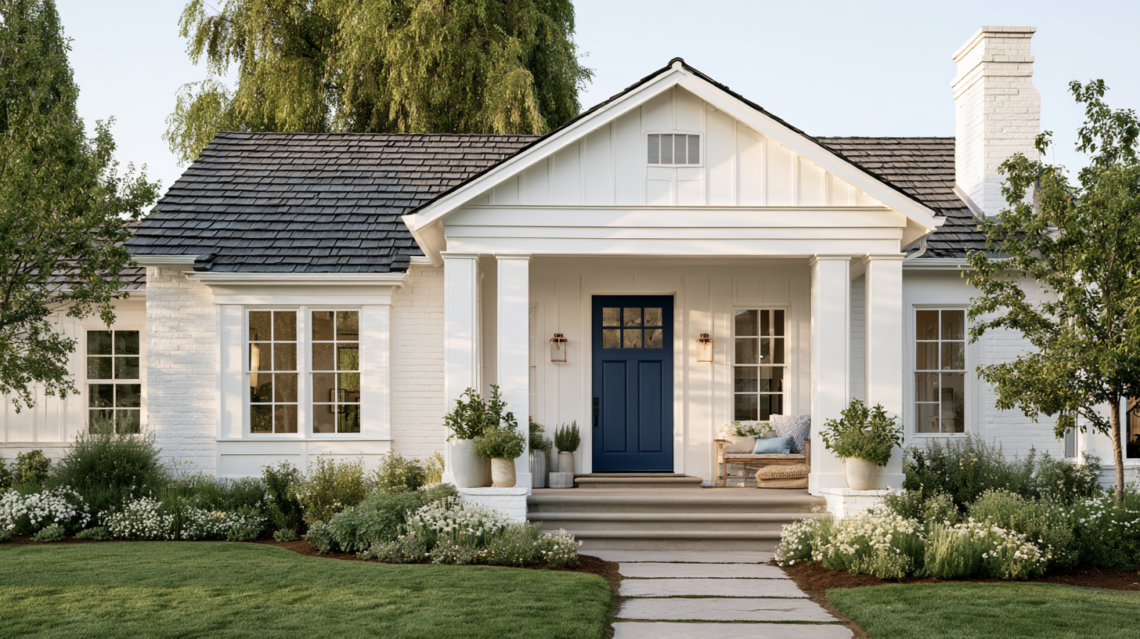
The color matters. Neutral doors — beige, tan, faded wood — disappear into the house. A door that reads as an intentional color choice says this was decided. Deep forest green, navy, matte black, rich terracotta, warm burgundy — these colors make a door a feature instead of just an opening.
The hardware upgrade that makes it complete: swap your door handle and deadbolt for a matching set in matte black or brushed brass. Mismatched hardware — a gold knob with a silver deadbolt, or anything chrome — undercuts even a beautiful paint job. A new handle set runs $30–60 and takes twenty minutes with a screwdriver.
Together, a painted door and updated hardware transform the entire face of your home for under $100. Few exterior updates can change the look of an entry so quickly for such a relatively small investment.
What you’ll need:
- Exterior paint in your chosen color (one quart covers most doors)
- A small foam roller for a smooth finish — brushes leave streaks
- Painter’s tape and a drop cloth
- New handle set and deadbolt in a matching finish
2. Add Potted Plants on Either Side of the Entry
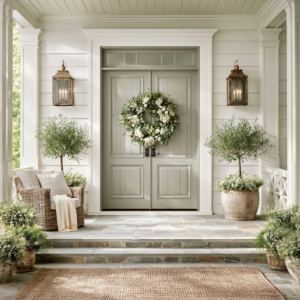
The front door is your focal point. Potted plants are what frame it — and two matching pots on either side of an entry do something almost architectural: they signal arrival. They tell visitors this is the place, come in.
The mistake most people make is going too small. A pair of 10-inch pots at a front door look like an afterthought. For most front entries, larger planters tend to look more substantial than small nursery pots. Choose a size that feels proportional to your doorway and leaves enough clearance for people to walk comfortably. The “thriller, filler, spiller” formula works perfectly here: one tall, upright plant in the center (a grass, a small shrub, a cordyline), surrounded by a filler plant that mounds, with something trailing over the edge.
The low-maintenance version: if you don’t want to think about watering – A high-quality faux topiary can be a practical alternative if you want the look of greenery without regular watering and maintenance — and the good ones are genuinely convincing at door distance. A 24-inch boxwood ball in a dark pot photograph beautifully and never dies.
Large ceramic or concrete pots run $40–80 each. Fill them with a potting mix, your plants, and slow-release fertilizer pellets and they’ll look full all season with minimal attention.
3. Update Your House Numbers (The Detail Nobody Notices Until It’s Wrong)

House numbers are one of those details that nobody consciously notices when they’re good — and everybody notices when they’re bad. Crooked brass numbers from 1987 that have turned greenish gold. Numbers so small the delivery driver has to squint from the street. A style that clashes with everything else on your home’s exterior.
This is a $20–40 fix that takes thirty minutes and has a disproportionate impact on how finished your home looks.
The rule: go bigger than you think you need to, and go matte. Large, modern house numbers in matte black or brushed nickel read cleanly from the street at any time of day. Polished brass and chrome catch light in ways that look dated next to most contemporary exteriors.
Spacing matters too — numbers that are too close together look compressed. Give them room to breathe and mount them level. Use a level. This is one of those small things that people can’t name but absolutely feel.
4. Edge Your Beds and Add Fresh Mulch
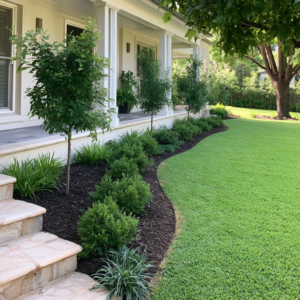
Here’s what fresh mulch does that nobody talks about: it makes everything around it look more intentional. The shrubs you already have look more planted. The edging looks more deliberate. The whole yard looks like someone is paying attention — because fresh mulch is one of the most visible signals of recent care.
A clean edge between your lawn and your planting beds does the same thing. An unedged bed where grass creeps in gradually reads as neglect even when the plants themselves are healthy. A crisp, defined edge reads as on purpose.
The two-step formula: edge first, then mulch. Use a half-moon edger or a flat spade to cut a clean line along the bed border. Then lay 2–3 inches of dark brown or black mulch across the bed. If the existing mulch layer is still in good condition and isn’t excessively deep, you can refresh it with a thin top layer. Avoid piling mulch against tree trunks or plant stems, and keep the finished depth appropriate for the type of mulch you’re using.
Check the coverage information on the bag to calculate how many you’ll need; coverage varies by product and depth. For most front yard beds, you’re looking at 5–10 bags and an afternoon of work. The transformation is immediate and dramatic out of all proportion to the effort.
There are many different edgers to choose from that are affordable and will make your look professional.
5. Add Pathway or Entry Lighting
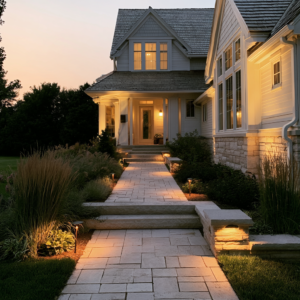
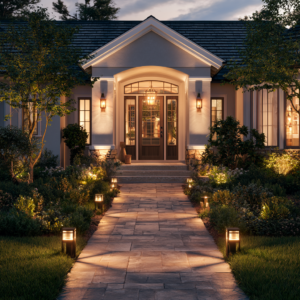
Most front yards have exactly one exterior light: the one mounted next to the door that casts a flat, harsh overhead glow and does almost nothing to make the home look welcoming at night.
Pathway lighting changes that entirely. Low stake lights along a front walkway do two things at once — they improve safety and they make your home look completely different after dark. Warm, layered, intentional. The kind of house you slow down to look at when you drive past at night.
Solar pathway lights have gotten genuinely good in the last few years. The ones worth buying are the low-profile metal ones — not the cheap plastic mushroom shapes that look fine in the box and terrible in the ground. Look for a warm (2700K) light output, a metal or resin body, and a stake length that keeps the light head low to the ground.
The placement rule: Space pathway lights according to the manufacturer’s recommended coverage and the width and layout of your walkway. Staggering fixtures on alternating sides can create a softer, less rigid look than placing them directly opposite one another. Alternating sides (staggered) looks more natural than perfectly mirrored.
The upgrade move: add a wall sconce or lantern on either side of the garage door if yours currently has nothing. Two matching sconces flank the garage the way potted plants flank a front door — they frame the space and make it feel finished.
Solar pathway lights are available at a wide range of price points, so look for warm lighting and a durable outdoor-rated construction rather than choosing based solely on price.
6. Add a Window Box (Or the Faux Version of One)
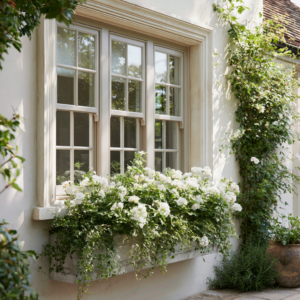
Window boxes are one of those things that make a house look like a home. They’re the detail that signals someone lives there and loves it — that this isn’t just a structure but a place someone is tending.
The real version is a weekend project: build or buy a cedar box, mount it below a front-facing window with heavy-duty exterior brackets, fill it with a mix of trailing and upright plants. Cedar is a popular choice for outdoor window boxes because it naturally handles outdoor conditions well and weathers attractively.
The no-commitment version: a pair of window box planters that mount with adjustable brackets work on almost any window without permanent installation. They’re removable, seasonal-swap-friendly, and look just as charming from the street.
What to plant: keep it simple. A trailing plant like sweet potato vine or bacopa at the edges, a filler like impatiens or petunias in the middle, and one slightly taller upright element in the back. Stick to two or three colors maximum — window boxes that try to do everything look busy from a distance.
The Honest Truth About Curb Appeal
A home that looks inviting from the outside isn’t one that had a landscape crew in last week. It’s one where a few specific things were done with intention: a door that reads as a color choice, pots that frame the entry, a walkway that’s lit after dark, beds that look tended.
None of these updates require a contractor. Most don’t require more than an afternoon and under $100 in materials. What they require is knowing which changes carry the most visual weight — and now you do.
Start with the front door. Everything else follows more naturally once the entry has a focal point worth walking up to.